
Title Sequence of the Film
Project
I have set out to make a very short film that would involve several VFX (visual effects) shots. I am extremely interested in VFX and therefore wanted to A. show what I can do and B. test myself. These are the two main goals of this project.
This involved creating a short story that would allow me to use VFX. I went through a few ideas before really finding a good balance between story and VFX. Since my whole goal was to do some VFX my story was not the focus. The story has some ambiguity to it, because the nature of the story is to support the VFX. This is not to undermine the story, but that was not my main focus.
I also wanted to use my knowledge of audio to create an environment. None of the audio in this project was from the film shoot, it was all added and altered in post-production.
The fun behind VFX is that it isn’t just something you slap on a video at the end, it is full of forethought and problem solving. I had to think about what the VFX would be before I shot so that I could plan to shoot them in a way where the VFX would help the story and make sense.
I am really drawn to the problem solving aspect of VFX, the entire process of going from point A to point B fascinates me.
Breaking Down The Project
Pre-Production
The pre-production stage covers everything from brainstorming right up to the film shoot. This involved coming up with my story, making a shot list, planning for the VFX, what lens would I use, who would be my actor/actress, etc. This was exciting because here is where I got to craft my story. The purpose of the pre-production phase is to cover all of your bases so that the next two phases are easier and you can focus on the project, or in my case, so I could focus on the VFX.
I spent 10 hours in the pre-production phase.
Production
This was the shortest of the three phases. After talking to the management for the building of the Craze and Florence’s Exquisite Candies I was able to shoot in the alley way between the two. I showed up with my wife as she was the actress and my AD (assistant director). We filmed our shots in order of equipment, meaning we did all the shots on a gimbal first, then we went to the tripod. This allowed me to save time and even though I was shooting out of order, I kept track of the shots we had so that in the edit bay I could put them in order.
I spent 3 hours total in the production phase.
Post-Production
For me, post-production is the most exciting part of any movie. The idea that someone can take a bunch of different shots and place them in a sequence to tell a story and that people can add elements that aren’t real or that were filmed separately is mind-blowing. This is also where I wanted to spend most of my time. I sat down and created a rough cut in DaVinci Resolve. Once I edit the rough cut, I then identified and exported all the shots that needed VFX work. I tracked this VFX using Google Sheets. I then went one by one and edited them and added all of the varying elements until I had what I wanted. I then exported the VFX shots out and replaced the old shots in DaVinci Resolve.
I then colored the shots and added all of the audio elements that you hear.
The final cut was now ready, but it felt off. I then showed it to some friends, family and mentors and received some feedback which lead me to creating a voice over track for the main character so we could hear what she was thinking. To make this stand out I went for an Anime vibe and included sections with no video and only audio to make the audio stand out.
The final step was to make it feel a little more cinematic so to do this I exported the final cut into After Effects, this is where I did all of my VFX work, and added film grain and a few effects to glue the VFX together to the real footage and to achieve that cinematic look I was striving for.
I spent 47 hours on the post-production phase.
This totals to 60 hours spent working on this project.

Editing in DaVinci Resolve

Coloring in DaVinci Resolve
Developing the Project
Since I was the only one who worked on this project I decided to stick to Google Sheets to streamline the process. I did not make a story board, but I did make a shot list. This helped me to visualize the shots and remember to get clean plates for VFX.
The link to the Google Sheets I used can be found here.
Phases of Post-Production
Rough Cut
I started with a rough cut so that I would have the exact clips I would need to do VFX. Since VFX are time intensive I didn’t want to do any more than needed.
Final Cut
I made leaps and strides from the rough cut, mainly because I was able to work on the VFX.
Project Summary and Work Flow
I was able to meet my goals of A. showing what I can do and B. testing myself. This project allowed me show off my skills in VFX in both a creative and practical sense. What I mean by this can be best demonstrated by the following stills.
This is taken from the intro sequence and as you can see there is a logo on the left side that I am not paying for or promoted by, therefore, I had to get rid of it. This is a common problem many companies face while filming.


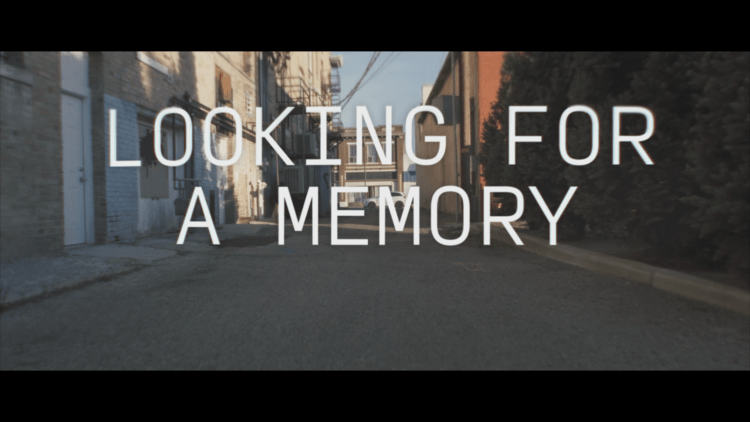
I tracked the camera in After Effects and added a power box and then put some graffiti over it. I had to color match the power box and the graffiti and then I blurred them a little bit so they wouldn’t be too sharp for the image. I also used the tracked camera for the title “Looking For a Memory.” This did a few things for me, it allowed me to show the title while still being in the action, but also took the attention away from the power box and graffiti that I added in.
This was a solution to a very practical problem, hiding something that I don’t have the rights to film. This being said, this process can also be done to add a logo in. I could have placed a different logo over The Craze logo.
Creative VFX comes in with the portal and the brick that opens the portal.
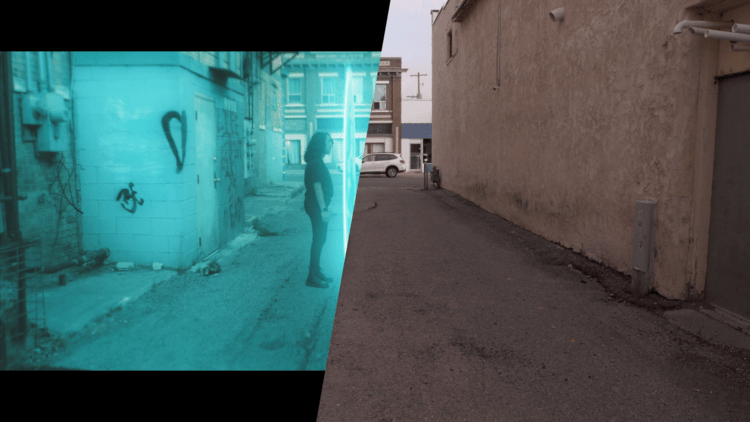
This is an example of how I was able to take an image add something that does not exist in the real world and I added blue to the surrounding areas to show the portal interacting with the world. This helps with selling the idea that a real portal was there.
For me, having a good VFX shot is so rewarding because you had to use problem solving skills to get the finished product and it involves a lot of behind the scenes work.
A great example of a shot that doesn’t seem difficult but takes a lot of time is the following still.

When watching a video it is important to note that the image is a 2D image, there is no space between the hand and the brick where I can just insert something. Instead, what I had to do was add the blue line and glow to the image and then create a mask around the main character’s hand. This mask would then allow me to cancel out the glow from where here hand is to make it look like the glow is beneath her hand and in front of the bricks.
Another important thing to note is that a video isn’t actually footage flowing together, it is a sequence of photos, or as they are referred to in video, frames, that are strung together quick enough that we think it is moving, when in reality they are still images. I chose to film at 23.976 FPS (frames per second). This means that for every frame I had to mask out the hand, and since it was moving, it was in a different place in each frame, so I had to mask out roughly 4 and a half seconds worth of footage, if we do the math that is 108 frames. I had to mask 108 images and that takes a long time. A LONG TIME. But, it sells the VFX shot, so it is a necessity. Well worth the many hours it took.
Since I was working with both After Effects and DaVinci Resolve that involved a lot of exporting, I used Apple ProRes 444 HQ so that It was be a rather big file size and I wouldn’t lose much quality in the several exports.
Working in DaVinci was a really good choice for me, because it has dedicated tabs for importing and managing files, editing, coloring, audio and exporting. DaVinci is very powerful in this regard and therefore made sense to my NLE (non-linear editing system).
I was able to mix the audio and get professional color grading out of DaVinci, aside from the ability to edit the video, and this helped streamline the process.
Challenges
I ran into a few challenges such as the story not being as cohesive as I would like or some of the shots just didn’t look good or fit together. These presented a lot of problems for me, how do I make this look better? How do I make the story stronger? How do I make this VFX look real?
I added a voice over of the main character’s thoughts so that the story would make more sense. This really helped sell the story and it helped to create good pacing. By having a voice over I could cut to black and have the voice continue talking. This allowed me to put two shots next to each other that normally wouldn’t work because there was a cut to black, but the story never stopped.
In order to help “glue” the VFX together I actually made a final cut, exported it and brought it into After Effects, I then added some film grain to break the image a little bit, I then warped the image and offset the colors ever so slightly to create a slight anamorphic look. This helped make everything look like it was real because again, it broke the image, which allowed the difference between the VFX and the real footage to be covered up by varying effects and plug ins.
I also made the choice to do all the audio work after the fact, or in post-production. This gave me the opportunity to create a world out of audio that didn’t exist. This was a challenge because I wasn’t sure what I wanted but as I looked for varying audio samples I was able to find sounds that created a city vibe environment while showing the dystopian-esque vibe of the world this film takes place in. All samples were taken from Youtube Audio Library and are royalty-free.
Focusing on the solution and not the problem was a big part of this project and it was key to getting this done within the allotted time.
What I Learned
I learned a lot about VFX while doing this, including what to keep in mind while shooting to allow for more efficiency during the post-production phase, I learned how to manage VFX shots and a solid workflow to get everything done.
I also realized the importance that audio can play a huge role in creating your world. VFX and SFX are both about problem solving, and if you cannot tell yet that is the theme of this project. Having a problem and finding a solution. The best part is, you don’t have to have the perfect solution, you just need a solution.